- Send a email when first powered up to let the user know that everything is working OK
- Send an email when water is detected on the sensor
- Send an email if the ambient temperature drops below 15C
- If a condition persists, resend the email every 5 minutes - rather than the scan time which is set to 1 minute
Monday, February 24, 2025
Water & Temperature Sensor
Monday, February 17, 2025
Weather
This is the temporary installation of my Anemometer & Wind Vane to test via RS-485 into a couple of ESP-32's. The outside temp is currently -30C so I'm not in any hurry to mount these up higher where they will be unobstructed!
Here is the pic of the 12V supply feeding a buck converter down to 5VDC to feed both ESP32's, one for the Anemometer and one for the Wind Vane. Buck converter in the centre under the white CAT5 cable that feeds 12VDC power to the devices and brings back 2 wires each RS485 to the RS485>TTL converters (top & bottom of photo). You can see one of the ESP32's with the green tape showing 00 on it.
You are supposed to be able to change the addresses on the devices (they all default to 1) so that they can share the same RS485 buss, but the documentation is sparse on these units and rather than take the chance that I 'brick' them, I'm leaving the addresses alone. Which means that I now have 3 devices (Anemometer, Wind Vane & Temperature/Humidity Sensor that are all RS485.
After receiving my Raspberry Pi Pico 2W's I started reading the documentation and found that the PIO function allows for additional UART's (it comes with 2), so I wrote a sketch to talk to 3 RS485>TTL boards from the 2 UARTs and 1 SoftwareSerial PIO-based UART
Here is a line diagram of the original circuit before I added the Pico, third TTL>RS485 board & Temp/Humidity Sensor
/*
* TempHumidRS485_3.ino
* Robin Greig
* 2025.02.17
*
* Reads the Temp & Humidity of RS485 device and prints it to Serial Monitor
*
* Using both UARTS and PIO-based UART to read 3 RS485 > TTL inputs
* mySerial1 = Rx / Pin 2 / GPIO 1 & Tx / Pin 1 / GPIO 0
* mySerial2 = Rx / Pin 7 / GPIO 5 & Tx / Pin 6 / GPIO 4
* mySerial3 = SerialPIO = Tx / Pin 11 / GPIO 8 & Rx / Pin 12 / GPIO 9
*
* Addint mqtt connectivity
*
* Based on the ModbusMaster example below
*/
#include <ModbusMaster.h> //https://github.com/4-20ma/ModbusMaster
#include <SoftwareSerial.h>
#include <WiFi.h>
#include <PubSubClient.h>
#include <string.h>
// Create a SoftwareSerial object to communicate with the MAX485 module
SoftwareSerial mySerial1(1, 0); // Rx-Pin 2-GPIO 1 & Tx-Pin 1-GPIO 0
SoftwareSerial mySerial2(5, 4); // Rx-Pin 2-GPIO 1 & Tx-Pin 1-GPIO 0
SerialPIO mySerial3(8, 9); // Tx-GPIO 8-Pin 11 & Rx-GPIO 12-Pin 10
//for SoftwareSerial PIO-based UART
// Create a ModbusMaster object
ModbusMaster node1;
ModbusMaster node2;
ModbusMaster node3;
// WiFi
const char *ssid = "Calalta02"; // Enter your WiFi name
const char *password = "Micr0s0ft2018"; // Enter WiFi password
// MQTT Broker
const char *mqtt_broker = "192.168.200.143";
const char *topic1 = "pico2w/00/temp1";
const char *topic2 = "pico2w/00/humid1";
const char *topic3 = "pico2w/00/temp2";
const char *topic4 = "pico2w/00/humid2";
const char *topic5 = "pico2w/00/temp3";
const char *topic6 = "pico2w/00/humid3";
const int mqtt_port = 1883;
WiFiClient espClient;
PubSubClient client(espClient);
float humidity1;
char humidChar1 [6];
float humidity2;
char humidChar2 [6];
float humidity3;
char humidChar3 [6];
float temperature1;
char tempChar1 [6];
float temperature2;
char tempChar2 [6];
float temperature3;
char tempChar3 [6];
void setup() {
// Initialize serial communication for debugging
Serial.begin(115200);
// Initialize SoftwareSerial for Modbus communication
mySerial1.begin(9600);
mySerial2.begin(9600);
mySerial3.begin(9600);
// Initialize Modbus communication with the Modbus slave ID 1
node1.begin(1, mySerial1);
node2.begin(1, mySerial2);
node3.begin(1, mySerial3);
WiFi.begin(ssid, password); // connecting to the WiFi network
while (WiFi.status() != WL_CONNECTED) {
delay(500);
Serial.println("Connecting to WiFi..");
}
Serial.println("Connected to the WiFi network");
//connecting to a mqtt broker
client.setServer(mqtt_broker, mqtt_port);
while (!client.connected()) {
String client_id = "pico2w-00 > ";
client_id += String(WiFi.macAddress());
Serial.printf("The client %s is connecting to the mqtt broker\n", client_id.c_str());
// if (client.connect(client_id.c_str(), mqtt_username, mqtt_password)) {
if (client.connect(client_id.c_str())) {
Serial.println("Mqtt broker connected");
} else {
Serial.print("failed with state ");
Serial.print(client.state());
delay(1000);
}
// Allow some time for initialization
delay(500);
}
}
void loop() {
uint8_t result1; // Variable to store the result of Modbus operations
uint16_t data1[2]; // Array to store the data read from the Modbus slave
uint8_t result2; // Variable to store the result of Modbus operations
uint16_t data2[2]; // Array to store the data read from the Modbus slave
uint8_t result3; // Variable to store the result of Modbus operations
uint16_t data3[2]; // Array to store the data read from the Modbus slave
// Read 2 holding registers for node1 starting at address 0x0000
// This function sends a Modbus request to the slave to read the registers
// result1 = node1.readHoldingRegisters(0x0000, 2);
result1 = node1.readHoldingRegisters(0x0000, 2);
// If the read is successful, process the data
if (result1 == node1.ku8MBSuccess) {
// Get the response data from the response buffer
data1[0] = node1.getResponseBuffer(0x00); // Humidity
data1[1] = node1.getResponseBuffer(0x01); // Temperature
// Calculate actual humidity and temperature values
humidity1 = data1[0] / 10.0; // Humidity is scaled by 10
temperature1 = data1[1] / 10.0; // Temperature is scaled by 10
// Print the values to the Serial Monitor
Serial.print("Humidity1: ");
Serial.print(humidity1);
Serial.println(" %RH");
Serial.print("Temperature1: ");
Serial.print(temperature1);
Serial.println(" °C");
Serial.println();
} else {
// Print an error message if the read fails
Serial.print("Modbus read failed: ");
Serial.println(result1, HEX); // Print the error code in hexadecimal format
Serial.println();
}
delay(200);
// Read 2 holding registers for node2 starting at address 0x0000
// This function sends a Modbus request to the slave to read the registers
result2 = node2.readHoldingRegisters(0x0000, 2);
// If the read is successful, process the data
if (result2 == node2.ku8MBSuccess) {
// Get the response data from the response buffer
data2[0] = node2.getResponseBuffer(0x00); // Humidity
data2[1] = node2.getResponseBuffer(0x01); // Temperature
// Calculate actual humidity and temperature values
humidity2 = data2[0] / 10.0; // Humidity is scaled by 10
temperature2 = data2[1] / 10.0; // Temperature is scaled by 10
// Print the values to the Serial Monitor
Serial.print("Humidity2: ");
Serial.print(humidity2);
Serial.println(" %RH");
Serial.print("Temperature2: ");
Serial.print(temperature2);
Serial.println(" °C");
Serial.println();
} else {
// Print an error message if the read fails
Serial.print("Modbus read failed: ");
Serial.println(result2, HEX); // Print the error code in hexadecimal format
Serial.println();
}
delay(200);
// Read 2 holding registers for node3 starting at address 0x0000
// This function sends a Modbus request to the slave to read the registers
result3 = node3.readHoldingRegisters(0x0000, 2);
// If the read is successful, process the data
if (result3 == node3.ku8MBSuccess) {
// Get the response data from the response buffer
data3[0] = node3.getResponseBuffer(0x00); // Humidity
data3[1] = node3.getResponseBuffer(0x01); // Temperature
// Calculate actual humidity and temperature values
humidity3 = data3[0] / 10.0; // Humidity is scaled by 10
temperature3 = data3[1] / 10.0; // Temperature is scaled by 10
// Print the values to the Serial Monitor
Serial.print("Humidity3: ");
Serial.print(humidity3);
Serial.println(" %RH");
Serial.print("Temperature3: ");
Serial.print(temperature3);
Serial.println(" °C");
Serial.println();
} else {
// Print an error message if the read fails
Serial.print("Modbus read failed: ");
Serial.println(result3, HEX); // Print the error code in hexadecimal format
Serial.println();
}
client.loop();
//client.publish(topic, temperatureTest ); //publish temp
sprintf(tempChar1,"%.2f", temperature1);
Serial.print("tempChar1 = ");
Serial.println(tempChar1);
client.publish(topic1, tempChar1); //publish temp
sprintf(humidChar1,"%.2f",humidity1);
Serial.print("humidChar1 = ");
Serial.println(humidChar1);
client.publish(topic2, humidChar1);
sprintf(tempChar2,"%.2f", temperature2);
Serial.print("tempChar2 = ");
Serial.println(tempChar2);
client.publish(topic3, tempChar2); //publish temp
sprintf(humidChar2,"%.2f",humidity2);
Serial.print("humidChar2 = ");
Serial.println(humidChar2);
client.publish(topic4, humidChar2);
sprintf(tempChar3,"%.2f", temperature3);
Serial.print("tempChar3 = ");
Serial.println(tempChar3);
client.publish(topic5, tempChar3); //publish temp
sprintf(humidChar3,"%.2f",humidity3);
Serial.print("humidChar3 = ");
Serial.println(humidChar3);
client.publish(topic6, humidChar3);
// Wait for 2 seconds before the next read
delay(2000);
}
Sunday, February 16, 2025
RS485 Modbus to Raspberry Pi Pico 2W
A while ago I went to order a wind vane and Anemometer online and didn't pay attention and ended up receiving RS485 units rather than the 0-10VDC units I wanted....grin
This gave me the incentive to learn how to connect RS485 devices to ESP8266's, ESP32's and in this case a new Raspberry Pi Pico 2W that had just arrived.
Here is the TTL > RS485 board I am using:
The wind vane and Anemometer are already outside so I ordered a couple of Temperature & Humidity sensors that you see here to continue to experiment with the RS485 protocol. On the breadboard you can see the Pico 2W on the left and then side by side is the TTL > RS485 board and a RFID-RC522 board that I've been playing with on the Arduino Uno shown at the top of the picture.
I wasn't able to connect a RS485 device to a ESP8266 since, as I understand it, the main UART is used for the serial USB communication and the second UART is transmit only? So in the case of the wind vane and Anemometer I used a couple of ESP32's. Normally you can connect multiple RS485 devices on the same bus as long as you set unique addresses on each, however I haven't done that yet, so I connected each device to it's own ESP32.
Given the low cost of the Pico 2W from pishop.ca I was able to use the same software from the Arduino Modbus sketch and just change the Tx & Rx pin assignments.
The next step will be to add wireless & mqtt code to the Pico 2W so that it can transmit the temperature and humidity values to my mosquitto broker to be read by Node-Red on my Raspberry Pi
Thanks for reading!
Here is the code:
/*
* TempHumidRS485a.ino
* Robin Greig
* 2025.02.15
*
* Reads the Temp & Humidity of RS485 device and prints it to Serial Monitor
*
* Based on the ModbusMaster example below
*/
#include <ModbusMaster.h> //https://github.com/4-20ma/ModbusMaster
#include <SoftwareSerial.h>
// Create a SoftwareSerial object to communicate with the MAX485 module
SoftwareSerial mySerial(1, 0); // RX, TX
// Create a ModbusMaster object
ModbusMaster node;
void setup() {
// Initialize serial communication for debugging
Serial.begin(115200);
// Initialize SoftwareSerial for Modbus communication
mySerial.begin(9600);
// Initialize Modbus communication with the Modbus slave ID 1
node.begin(1, mySerial);
// Allow some time for initialization
delay(1000);
}
void loop() {
uint8_t result; // Variable to store the result of Modbus operations
uint16_t data[2]; // Array to store the data read from the Modbus slave
// Read 2 holding registers starting at address 0x0000
// This function sends a Modbus request to the slave to read the registers
result = node.readHoldingRegisters(0x0000, 2);
// If the read is successful, process the data
if (result == node.ku8MBSuccess) {
// Get the response data from the response buffer
data[0] = node.getResponseBuffer(0x00); // Humidity
data[1] = node.getResponseBuffer(0x01); // Temperature
// Calculate actual humidity and temperature values
float humidity = data[0] / 10.0; // Humidity is scaled by 10
float temperature = data[1] / 10.0; // Temperature is scaled by 10
// Print the values to the Serial Monitor
Serial.print("Humidity: ");
Serial.print(humidity);
Serial.println(" %RH");
Serial.print("Temperature: ");
Serial.print(temperature);
Serial.println(" °C");
Serial.println();
} else {
// Print an error message if the read fails
Serial.print("Modbus read failed: ");
Serial.println(result, HEX); // Print the error code in hexadecimal format
}
// Wait for 2 seconds before the next read
delay(5000);
}
Saturday, February 8, 2025
RFID on Arduino
I've been wanting to get develop a low security wooden lock box that I can use for a project. I've had these RFID-RC522 units for quite awhile and it was time to get back playing with them.
Rui & Sara Santos of Random Nerd Tutorials have a great tutorial on how to hook this up to an Arduino Uno as shown or ESP8266 or even ESP32 (both with WiFi). They also have a tutorial for using this RFID reader as an attendance checker.
I picked these up off from Phillip Fry Electronics Canada however they seem to be offline since Canada Post went on strike last fall and you can also get them off ebay. Inexpensive devices and the kits usually come with a card and keychain dongle.
I've got a red LED inbetween the wires that I've hooked to a GPIO on the Uno and if the card ID is accepted, the LED lights. I could use that output with a FET to power a solenoid to unlock the door of my lockbox.
Thanks for reading,
Robin
08 Feb 2025
Monday, January 27, 2025
Understanding RSSI
Understanding RSSI (Received Signal Strength Indicator) can be a confusing topic to understand how strong the radio / wifi signal is to your device. Here is a great chart to help:
I often add RSSI feedback from my ESP8266 devices so that I can confirm that they have good signal strength where I place them.
Sunday, April 7, 2019
Thanks for viewing!
Robin
Tuesday, March 26, 2019
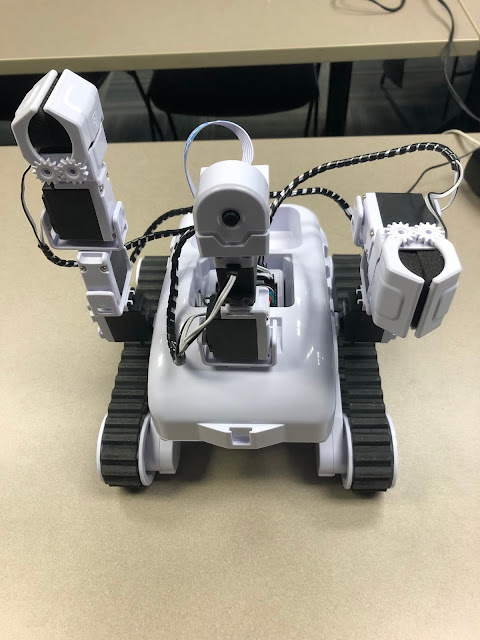
EZ-Robot Roli

I've been taking a course to learn all of the features of this EZ-Robot Roli. It has an awesome software package that enables you to perform facial recognition, voice commands, line following, etc.
I'll be teaching this course in May and am looking forward to all of the great ideas my students will come up with.
You can find out more at EZ Robot Website
Thanks for visiting!
Robin
Tuesday, January 29, 2019
PIC Programming with PICkit 2
What I am going to try to do is take a pic of each of the projects I'm working on and post them here. I've been busy with Raspberry Pi attendance monitors (Pi, Barcode Scanner & mariadb backend), Pi remote controls (using the above attendance monitor) and have gone back to playing with PIC micros using assembler and C compiler!
Here is a photo of my ...old... PICkit 2 connected to the microchip Low Pin Count Demo board. If you want to check out some AWESOME tutorials on programming the PIC's go to David Meiklejohn's site gooligum (cool name!)
Sunday, July 9, 2017
Raspberry Pi 3 Alarm System
Well this is the final prototype for my Raspberry Pi 3 Alarm system. It uses the USB keypad in the upper left corner to input the correct code, the entry and exit delay beeper is in the lower left of the photo beside the keyboard, and the LED's showing what is going on is on the breadboard just above the keyboard. You cannot see the PIR sensors, that I have mounted on the pole of the shelf that is visible in the upper right of the picture.
The next step (today) is to mount all of the components on a board and see how everything will fit into the case!
I'll post a final pic once I have everything mounted in the case.
Thanks for viewing!
Robin
Sunday, April 30, 2017
Connecting Raspberry Pi 3 and Arduino
I've decided it was time to update the last post (it's only been about 16 months!)
- Install Jesse Raspbian with Pixel 2017-04-10
- Go thru the configuration
- Change the pi password
- Change the Pi Hostname
- Don’t automatically login to ‘pi’ user
- Under the Interfaces Tab:
- Camera = Disable
- SSH = Enable
- SPI = Enable
- I2C = Enable
- Serial = Disable
- I don't change anything under the Performance Tab
- Under the Localisation Tab:
- Change the locale to Canada (English)
- Set the Timezone to Canada (America) > Mountain (Edmonton)
- I’m still having a problem with changing the keyboard layout
- It is a noted problem on the Raspberry Pi Forum
- Still using sudo raspi-config to config to Canada > English
- sudo apt-get update
- sudo apt-get upgrade
- sudo adduser robin
- add robin to same groups as pi user (dialout for arduino)
- sudo apt-get install arduino
- sudo apt-get install arduino-mk
- Modify avrdude.conf to work with GPIO pins
- sudo nano /etc/avrdude.conf
- Ctrl-W to find the gpio reference, and uncomment the following lines
- programmer
- id = "linuxgpio";
- desc = "Use the linux sysfs interface to bitbang GPIO lines";
- type = "linuxgpio";
- reset = ?;
- sck = ?;
- mosi = ?;
- miso = ?;
- ;
- And change the ? to;
- reset = 8 (GPIO # not Actual pin #24, CE0)
- sck = 11 (Actual pin #23, SCLK)
- mosi = 10 (Actual pin #19, MOSI)
- miso = 9 (Actual pin #21, MISO)
- Wire up the Arduino ICSP header as follows:
(RESET is closest to IC)
-------------------
| MISO +5V |
| SCK MOSI |
| RESET GND |
------------------- - RESET to Raspi pin 24
- SCK to Raspi pin 23
- MISO to Raspi pin 21
- +5V to Raspi pin 2
- MOSI to Raspi pin 19
- GND to Raspi pin 6
- Type in sudo avrdude -v to ensure avrdude is responding
- Type in sudo avrdude -p atmega328p -c linuxgpio -v to ensure avrdude can communicate with the arduino
- As mentioned in my previous post, I copy my raspi-git github directory to each Raspi to make it easier to copy common files back and forth.
- cp -r ~/raspi-git/Uno/Blink ~ (to copy the blink directory to my home directory)
- move to the ~/Blink directory and run the following to download the software into the arduino
- sudo avrdude -p atmega328p -c linuxgpio -v -U flash:w:./build-uno/Blink.hex:i
- If all goes well this should upload the Blink.hex program to the arduino
- Check the Makefile for the following lines:
- BOARD_TAG = uno
- ARDUINO_PORT = /dev/ttyACM0
- ARDUINO_LIBS =
- ARDUINO_DIR = /usr/share/arduino
- include /usr/share/arduino/Arduino.mk
- Check it by modifying the ~/Blink/Blink.ino file and recompiling it
- nano ./Blink/Blink.ino
- Change the blink rate
- Ctrl-x to save
- make
- sudo avrdude -p atmega328p -c linuxgpio -v -U flash:w:./build-uno/Blink.hex:i
- the changes should be apparent on the Arduino LED
Wednesday, December 16, 2015
Avrdude 6.1
- Install Jesse 2015-11-21
- Go thru the configuration
(Menu > Preferences > Raspberry Pi Configuration) - Under the System Tab:
- Expand the filesystem
- Change the pi password
- Change the Pi Hostname
- Don’t automatically login to ‘pi’ user
- Under the Interfaces Tab:
- Camera = Disable
- SSH = Enable
- SPI = Enable
- I2C = Enable
- Serial = Disable
- I don’t change anything under the Performance Tab
- Under the Localisation Tab:
- Change the locale to Canada (English)
- Set the Timezone to Canada (America) > Mountain (Edmonton)
- I’m still having a problem with changing the keyboard layout
- It is a noted problem on the Raspberry Pi Forum
- Still using sudo raspi-config to config to Canada > English
- sudo apt-get update
- sudo apt-get upgrade
- sudo adduser robin
- sudo visudo to give robin the same rights as pi user
- sudo apt-get install arduino-mk
- sudo apt-get install arduino (add robin to dialout group)
- Make a link to the Arduino.mk file:
ln -s /usr/share/arduino/Arduino.mk ~/Arduino.mk - Copy the original avrdude.conf file into my home directory
- cp /etc/avrdude.conf ~/avrdude_gpio.conf
- Modify it to work with the GPIO pins
- nano ~/avrdude_gpio.conf
- Aff the following lines at the end of the file:
- # Linux GPIO configuration for avrdude
- # Change the lines below to the GPIO pins connected to the AVR
- programmer
- id = "pi_1";
- desc = "Use the Linux sysfs interface to bitbang GPIO lines";
- type = "linuxgpio";
- reset = 12;
- sck = 24;
- mosi = 23;
- miso = 18;
- ;
- With the Arduino connected to the Raspberry Pi, run the following line to make sure the Raspi can see the arduino:
sudo avrdude -p atmega328p -C ~/avrdude_gpio.conf -c pi_1 -v - git clone https://github.com/robingreig/raspi-git
- cp -r ~/raspi-git/Python ~ (to copy the Python directory to my home)
- cp -r ~/raspi-git/Uno ~ (to copy the Uno directory to my home)
- Goto the .hex file @ ~/Uno/Serial/Voltages/build-uno/Voltages.hex & run:
sudo avrdude -p atmega328p -C ~/avrdude_gpio.conf -c pi_1 -v -U flash:w:Voltages.hex:i - If you overwrite the bootloader, reload it by going to:
cd /usr/share/arduino/hardware/arduino/bootloaders/optiboot/
and running the avrdude line with the optiboot_atmega328.hex file