Pages

Saturday, February 8, 2025

RFID on Arduino


 I've been wanting to get develop a low security wooden lock box that I can use for a project. I've had these RFID-RC522 units for quite awhile and it was time to get back playing with them.

Rui & Sara Santos of Random Nerd Tutorials have a great tutorial on how to hook this up to an Arduino Uno as shown or ESP8266 or even ESP32 (both with WiFi). They also have a tutorial for using this RFID reader as an attendance checker.

I picked these up off from Phillip Fry Electronics Canada however they seem to be offline since Canada Post went on strike last fall and you can also get them off ebay. Inexpensive devices and the kits usually come with a card and keychain dongle. 

I've got a red LED inbetween the wires that I've hooked to a GPIO on the Uno and if the card ID is accepted, the LED lights. I could use that output with a FET to power a solenoid to unlock the door of my lockbox. 

Thanks for reading,

Robin

08 Feb 2025

Monday, January 27, 2025

Understanding RSSI

 Understanding RSSI (Received Signal Strength Indicator) can be a confusing topic to understand how strong the radio / wifi signal is to your device. Here is a great chart to help:


 I often add RSSI feedback from my ESP8266 devices so that I can confirm that they have good signal strength where I place them.


Sunday, April 7, 2019

I finally got around to installing a set of fuses and a terminal strip on an old computer power supply that I had. 3.3V @ 20A, 5V @ 16A, 12V @ 16A, thus the need for fuses! I also added a small digital voltage regulator that you can see in the bottom left of the pic, so I have a variable power supply that I can step down to a specific voltage if necessary.
Thanks for viewing!
Robin

Tuesday, March 26, 2019

EZ-Robot Roli


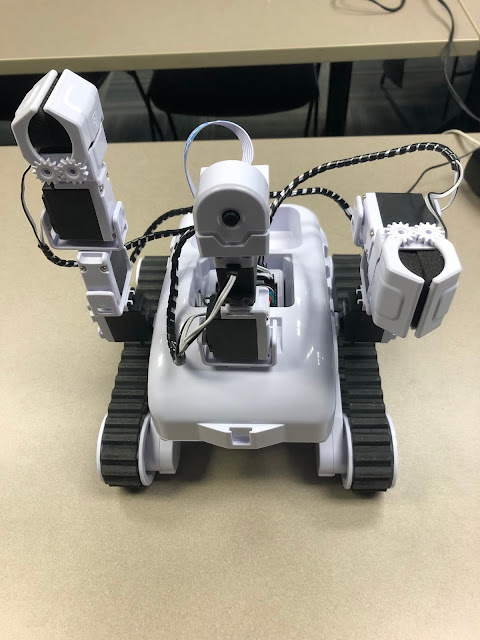
I've been taking a course to learn all of the features of this EZ-Robot Roli. It has an awesome software package that enables you to perform facial recognition, voice commands, line following, etc.
I'll be teaching this course in May and am looking forward to all of the great ideas my students will come up with.
You can find out more at EZ Robot Website
Thanks for visiting!
Robin

Tuesday, January 29, 2019

PIC Programming with PICkit 2

Wow!, I make one post then turn around and another year has passed me by....YIKES!
What I am going to try to do is take a pic of each of the projects I'm working on and post them here. I've been busy with Raspberry Pi attendance monitors (Pi, Barcode Scanner & mariadb backend), Pi remote controls (using the above attendance monitor) and have gone back to playing with PIC micros using assembler and C compiler!

Here is a photo of my ...old... PICkit 2 connected to the microchip Low Pin Count Demo board. If you want to check out some AWESOME tutorials on programming the PIC's go to David Meiklejohn's site gooligum (cool name!)

Sunday, July 9, 2017

Raspberry Pi 3 Alarm System

What is this mess, you might ask?

Well this is the final prototype for my Raspberry Pi 3 Alarm system. It uses the USB keypad in the upper left corner to input the correct code, the entry and exit delay beeper is in the lower left of the photo beside the keyboard, and the LED's showing what is going on is on the breadboard just above the keyboard. You cannot see the PIR sensors, that I have mounted on the pole of the shelf that is visible in the upper right of the picture.

The next step (today) is to mount all of the components on a board and see how everything will fit into the case!

I'll post a final pic once I have everything mounted in the case.

Thanks for viewing!
Robin

Sunday, April 30, 2017

Connecting Raspberry Pi 3 and Arduino

WOW, I cannot believe that it has been over a year since my last post. Time flies when you're having fun!!!

I've decided it was time to update the last post (it's only been about 16 months!)


  1. Install Jesse Raspbian with Pixel 2017-04-10
  2. Go thru the configuration
    1. Change the pi password
    2. Change the Pi Hostname
    3. Don’t automatically login to ‘pi’ user
  3. Under the Interfaces Tab:
    1. Camera = Disable
    2. SSH = Enable
    3. SPI = Enable
    4. I2C = Enable
    5. Serial = Disable
  4. I don't change anything under the Performance Tab
  5. Under the Localisation Tab:
    1. Change the locale to Canada (English)
    2. Set the Timezone to Canada (America) > Mountain (Edmonton)
    3. I’m still having a problem with changing the keyboard layout
      1. It is a noted problem on the Raspberry Pi Forum
      2. Still using sudo raspi-config to config to Canada > English
  6. sudo apt-get update
  7. sudo apt-get upgrade
  8. sudo adduser robin
  9. add robin to same groups as pi user (dialout for arduino)
  10. sudo apt-get install arduino
  11. sudo apt-get install arduino-mk
  12. Modify avrdude.conf to work with GPIO pins
    1. sudo nano /etc/avrdude.conf
    2. Ctrl-W to find the gpio reference, and uncomment the following lines
    3. programmer
      1. id = "linuxgpio";
      2. desc = "Use the linux sysfs interface to bitbang GPIO lines";
      3. type = "linuxgpio";
      4. reset = ?;
      5. sck = ?;
      6. mosi = ?;
      7. miso = ?;
      8. ;
    4. And change the ? to;
      1. reset = 8 (GPIO # not Actual pin #24, CE0)
      2. sck = 11 (Actual pin #23, SCLK)
      3. mosi = 10 (Actual pin #19, MOSI)
      4. miso = 9 (Actual pin #21, MISO)
    5. Wire up the Arduino ICSP header as follows:
      (RESET is closest to IC)
      -------------------
      | MISO    +5V |
      | SCK     MOSI |
      | RESET  GND |
      -------------------
      1. RESET to Raspi pin 24
      2. SCK to Raspi pin 23
      3. MISO to Raspi pin 21
      4. +5V to Raspi pin 2
      5. MOSI to Raspi pin 19
      6. GND to Raspi pin 6
    6. Type in sudo avrdude -v to ensure avrdude is responding
    7. Type in sudo avrdude -p atmega328p -c linuxgpio -v to ensure avrdude can communicate with the arduino
    8. As mentioned in my previous post, I copy my raspi-git github directory to each Raspi to make it easier to copy common files back and forth.
    9. cp -r ~/raspi-git/Uno/Blink ~ (to copy the blink directory to my home directory)
    10. move to the ~/Blink directory and run the following to download the software into the arduino
      1. sudo avrdude -p atmega328p -c linuxgpio -v -U flash:w:./build-uno/Blink.hex:i
      2. If all goes well this should upload the Blink.hex program to the arduino
    11. Check the Makefile for the following lines:
      1. BOARD_TAG = uno
      2. ARDUINO_PORT = /dev/ttyACM0
      3. ARDUINO_LIBS =
      4. ARDUINO_DIR = /usr/share/arduino
      5. include /usr/share/arduino/Arduino.mk
    12. Check it by modifying the ~/Blink/Blink.ino file and recompiling it
      1. nano ./Blink/Blink.ino
      2. Change the blink rate
      3. Ctrl-x to save
      4. make
      5. sudo avrdude -p atmega328p -c linuxgpio -v -U flash:w:./build-uno/Blink.hex:i
      6. the changes should be apparent on the Arduino LED